
When I decided to start designing and publishing patterns I searched for information on how and where to begin the process, but wasn’t able to find much help on-line. It was quite daunting! I thought I’d share my process and experience in the hopes it may be there when someone else goes looking…
Inspiration
 Sometimes, I start with some fabrics I love, and design a quilt to showcase them. Other times, I see a design in my mind’s eye and go looking for the fabrics that will best fit that design. I am often awake at 3:00 AM (!) with quilt ideas swirling around in my mind. My next quilt design is taken from an idea I had while looking at our shower curtain! Inspiration can come at any time, so be ready to jot down those ideas when they arise.
The Mechanics
You will need a plan on how to create and publish the actual pattern. After researching various software options, I went with Corel Draw. I use it for the layout, design and pattern illustration/diagrams. I then export it in a PDF format for publishing. Sometimes, I will also use Word to create the text, then copy and paste it into the pattern template in Corel Draw. I had some experience in graphic design and layout from a newsletter I used to create, so the learning curve was probably a bit easier for me. There are many other options out there, so look around to see what fits your skill level and budget.
Another consideration is whether you will use diagrams, drawings or photos. The general rule of thumb is patterns use diagrams and tutorials use photos. Basically, you need a program (or programs) to be able to create the diagrams and text, then combine them in the layout. For me, Corel Draw does all three.

Designing
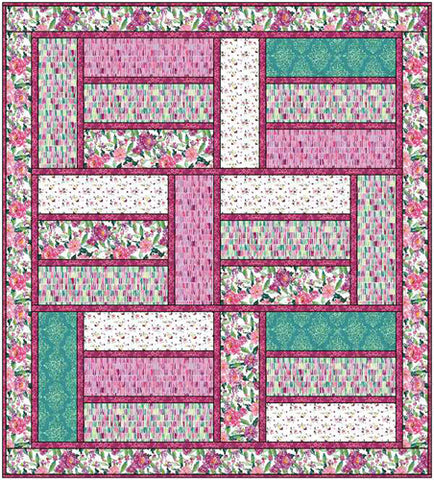
I like to use Electric Quilt (EQ) software to design my quilts. It lets you try out different variations and fabrics, calculates fabric yardage and gives rotary cutting diagrams and templates. You can even export your designs (the Electric Quilt design for The Big Easy is shown above). Some people just draw their design out on paper. I do that often, then take the design into EQ when I have it finalized in my mind.
Below are the EQ designs from Cobblestone Charm and Circle Time


You know the saying, the best laid plans of mice and men? Maybe it should include quilters! There have been times when I simply could not get what I saw in my mind to translate to fabric. This has been especially true when designing for precuts. I love to design quilts for pre-cuts because I tend to have lots of them in my stash and need a way to use them. For a pattern to work with pre-cuts, you need to be able to use close to the number of fabric cuts in each pre-cut package. Layer cakes usually have 42 - 10 inch squares. Charm packs usually have 42 - 5 inch squares and Jelly Rolls/Strip packs usually have 40 - 2.5 inch strips. Pre-cut patterns should have fabric requirements that use close to these numbers so there is no waste or need to over purchase fabric. I have abandoned a couple of design ideas because I could see no way to adapt my idea to work within these limits.
Begin the Quilt!
When it’s time to begin the quilt, I take my EQ print out and pattern notes into my studio and cut the fabrics. As I do this, I write down the cutting requirements for the quilt. If it is complicated, I will include cutting diagrams. If the pattern is to have more than one size option, I will calculate the fabric requirements and variations on the cutting instructions at this stage, writing them down in a table format so I can transfer them when I sit down at the computer.
I then go through the process of making the sample quilt, sometimes two or three to show the pattern with different fabric options. This is very time consuming! I write down each step of the piecing process in a notebook so I can transfer them to the computer when I create the pattern. At this stage, I will write down not only the step-by-step instructions, but roughly drawn diagrams for each step as well. Remember to include details like which direction to press the seams and how many of each “step” to make.
When the quilt top is complete, it is quilted, then photographed for the cover of the pattern. I then sit down at the computer and create the actual pattern. When I first began, this took A LOT of time! Starting from scratch with the pattern layout, font choices, headings, etc. took a lot of experimentation. For subsequent patterns, its much easier because the basic template is there. Also, if there are repeated instructions (such as borders, flying geese or half square triangles), these can be copied from a previous pattern, saving a lot of time and work.
In Summary
I really like the PDF publishing format, where the patterns are sold as digital downloads. This makes them more affordable to quilters (saving on printing and shipping charges) AND they are available immediately, rather than waiting for mail delivery.
I hope I have encouraged you to test the waters with your design ideas! The most important thing is to START, take it one step at a time, be patient with yourself and trust the creative process.
